Gilded Pepe Series
These Large Butterfly Installations are made from a grouping of individual cut and hand painted butterflies. Each edition is numbered and unique but similar. If you would like to talk about commissioning a set or have any questions I would love to hear from you. You can also go to the Shop Now Page to purchase and to view my other butterfly artworks and colour options.
Gilded Pepe

Puriri Moth
Hanging Gilded Pepe
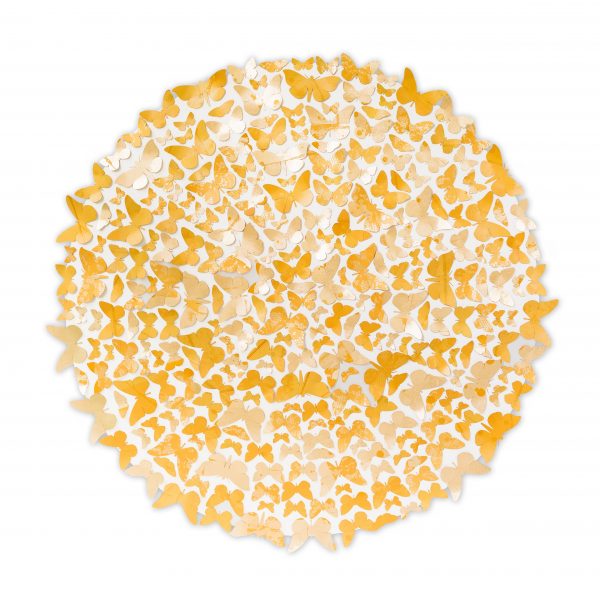
Gilded Pepe
Individual Butterflies
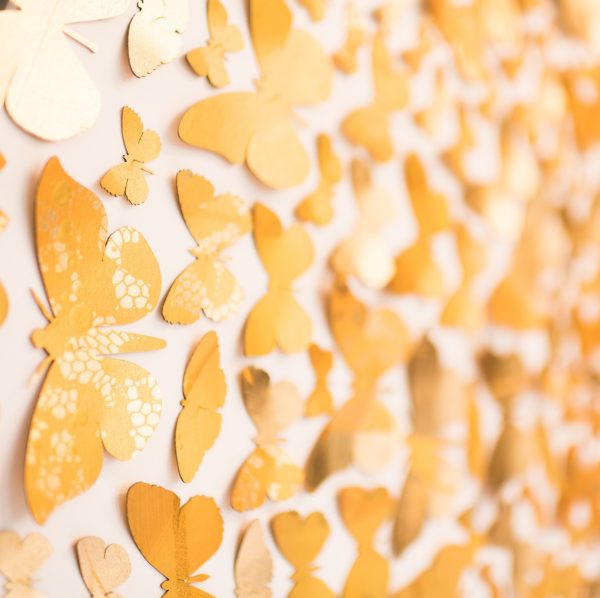
Details-Gilded Pepe
How are they hung?
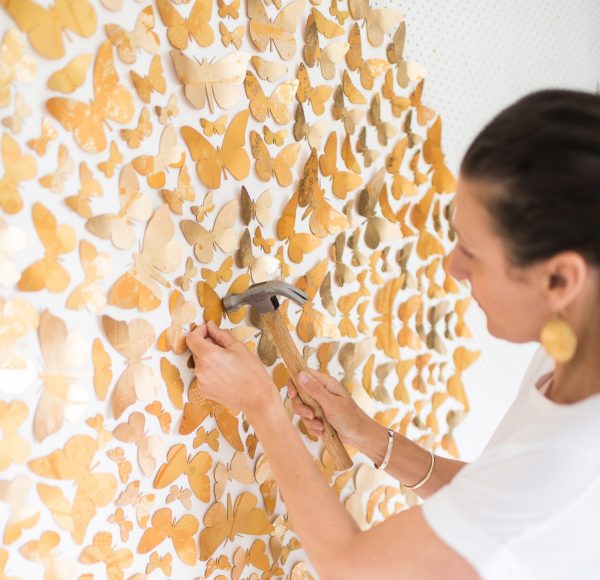
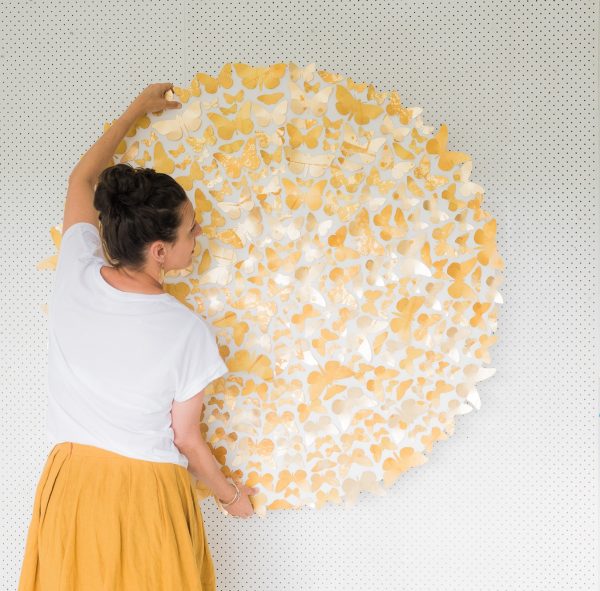
Each set is designed to be hung directly onto the wall or a wooden panel in a 120cm circle or hung on the wall as a flock. The butterflies are applied with a small dot of museum wax and then a golden pin is tapped through each butterfly. The circle can be supplied pre-hung on the round wooden panel. This panel can be painted white or the colour of the wall. A panel is helpful if you are planning to move the installation or if I am unable to hang it for you and you don’t wish to hang it yourself.
What are they made of?
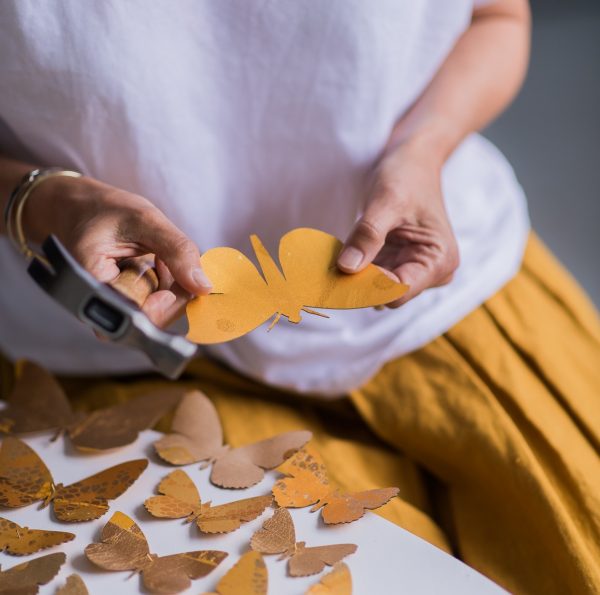
Each Butterfly is cut from 100% cotton 650gsm high quality, acid free art card. They are then painted (and or gold leafed) then varnished. They look lovely and fragile but are robust and feel a little like thin wooden veneer or balsa wood.
What colours are available?
I create these editions in a variety of colours, examples can be seen on my website, instagram and facebook.
How do I order a set?
If you have an idea of what you would like or have questions I would love to hear from you. Call, email or message me and we can chat over options and go from there. Or click here to buy online
027 475 4243 anna@annastichbury.co.nz Find me on Facebook
Should you choose to hang the work yourself here are all the instructions
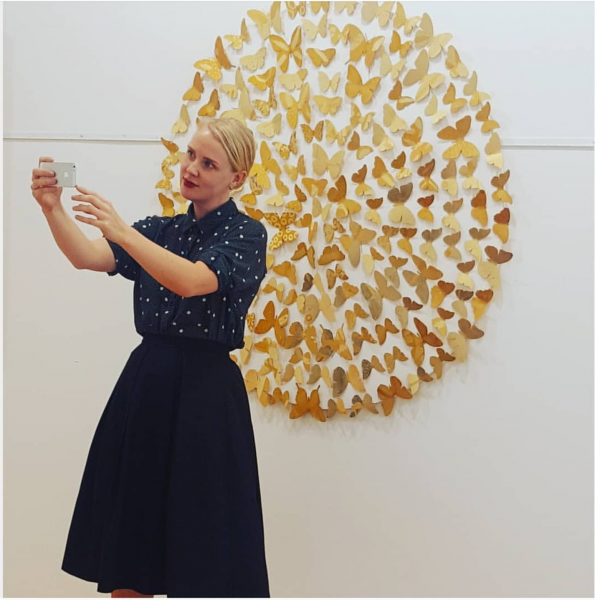
Butterfly installation instructions- CIRCLE
Hanging as a circle-
First choose the wall you will be hanging on. Make sure the wall is clean.
Decide where you wish to place the artwork and choose the centre point.
Push a pin into that point. Take a piece of string the width you would like the artwork and then fold it in half and tie it to the centre pin. Tie a pencil at the other end from the pin and pull it tight. You have now made a compass. Keeping the string tight you should be able to draw a line of dots in a perfect circle around your centre point. Remove the string and pencil but keep the pin in the wall so you know where centre is.
There is a small ball of museum wax attached to the back of each butterfly. This wax will hold the butterfly in place on the wall. Just press GENTLY, no need to squash it hard against the wall. Placing it gently will allow you to remove and replace each butterfly as many times as you like. I tend to place butterflies around the outside pencil circle first. Place the body of the chosen butterflies on the pencil dots or line. Space them evenly and snugly. This will give you the outside circle of butterflies. I then pop a small butterfly directly in the middle where the pin was. Then fill in the circle spreading the various butterfly sizes and colours randomly and snugly throughout the space. Each butterfly should be flying towards the outer circle. Start in the middle and work out. Refer to images supplied or online for help with the layout and final design. Also check my Facebook page and Instagram for the video of me hanging a set or images of completed installations.
Once all the butterflies are in the desired arrangement tap a gold pin into each body with a small hammer to hold it permanently in place. Leave half the pin length visible like a specimen case (do not tap it fully into the wall) I often gently bend the wings edges up slightly at this point if they need it, they should have arrived with a slight curve but this can sometimes be flattened whilst in the box. Press down gently in the middle of the wing with your thumb and pull bend the outer wing up slightly. Don’t bend the butterflies from the centre or you may crease the body. You can now use an eraser or damp cloth to remove any pencil marks from the wall you can still see.
Refer to the images as you go to help translate these instructions and just call me if you would find it helpful for me to talk you through it.
Anna Stichbury 027 475 4243
Butterfly installation instructions- FLOCK
First choose the wall you will be hanging on. Make sure the wall is clean.
Decide where you wish to place the artwork and choose the starting point.
I tend to start at the lowest point and work my way up to the end of the installation placing varied butterflies in a random loose pattern or flock. I may then go back and fill them in more tightly once I have created the general shape if needed. All butterflies should be heading in the same direction. There is a ball of museum wax attached to the back of each butterfly. This wax will hold the butterfly in place on the wall. Just press GENTLY, no need to squash it hard against the wall. Placing it gently will allow you to remove and replace each butterfly as many times as you like. Any wax left on the wall can be removed by scrapping it off or a firm wipe with a cloth. Spread the various butterfly sizes and colours randomly throughout the space. Refer to images supplied or online for help with the layout and final design. Also check my Facebook page and Instagram for images of completed installations.
Once all your butterflies are in the desired arrangement tap a gold pin into the centre of each body with a small hammer to hold it permanently in place. Leave half the pin length visible protruding from the body like in a specimen case (do not tap it fully into the wall) I often gently pull/bend the wings up slightly at this point if needed, they should have arrived with a slight curve but this can sometimes be flattened whilst in the box. Press down gently in the middle of the wing with your thumb and pull bend the outer wing up slightly. Don’t bend the butterflies from the centre or you may crease the body.
Refer to the images as you go to help translate my instruction and just call me if you would find it helpful for me to talk you through it.
Anna Stichbury 027 475 4243
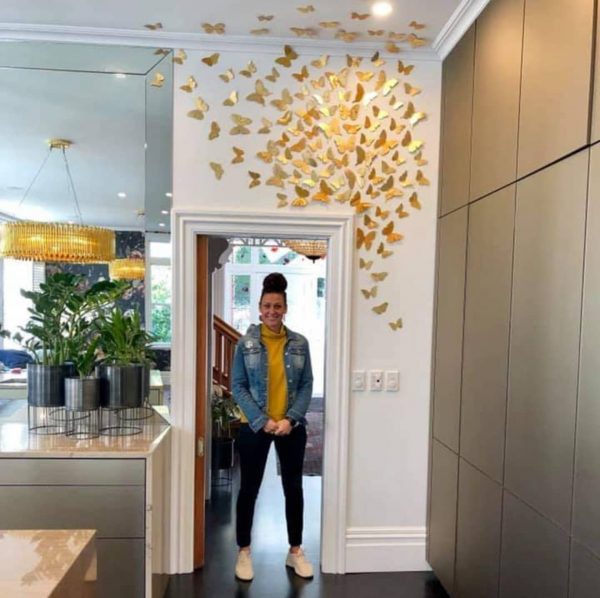
An example of a FLOCK and a CIRCLE hung in situ.
To see images of similar artworks hung visit